Chrome OS is quite famous among students as it is very lightweight and efficient. It may not have a lot of features like Windows 10, but it doesn’t have big system requirements. You can easily run it on your old PC. Just install Chrome OS on your PC and enjoy.
Google doesn’t allow installing Chrome OS on normal computers. So, Neverware has created CloudReady OS from the same Chromium source as of Chrome OS, which you can install on your PC. But you won’t be getting Play Store support in Cloudready OS.
Install Chrome OS on your Computer in 2025
So, in this tutorial, we are going to show you how to install Chrome OS via Neverware’s CloudReady OS on your Computer. Though there is no Play Store support on CloudReady OS, you can still use Linux on Chrome OS. Let’s check the steps in detail.
WARNING: You might face problems with Chrome OS on AMD graphics cards. But you can still try it and see if it works for you.
Step 1: Download CloudReady OS USB Maker
First of all, go to the CloudReady OS download page. Here scroll down a bit and click on the “DOWNLOAD USB MAKER” button.
This is an official tool provided by Neverware for creating a bootable USB to install Chrome OS on a PC. Download size is 48 MB approximately.
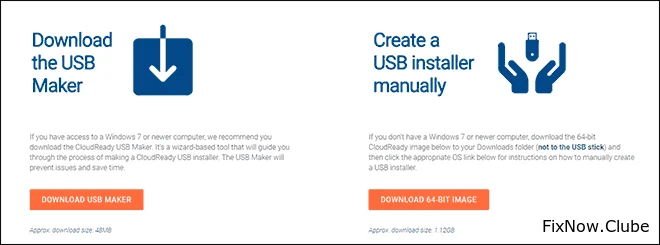
Download USB Maker for Cloudready Chrome OS
Step 2: Make Bootable USB for Chrome OS
After downloading the USB Maker, run the setup. It will show you the requirements, get a USB disk of 8 GB or greater size ready. Insert the USB disk and click Next >.
NOTE: The USB maker doesn’t support Sandisk USB drives. So, avoid using Sandisk USBs.
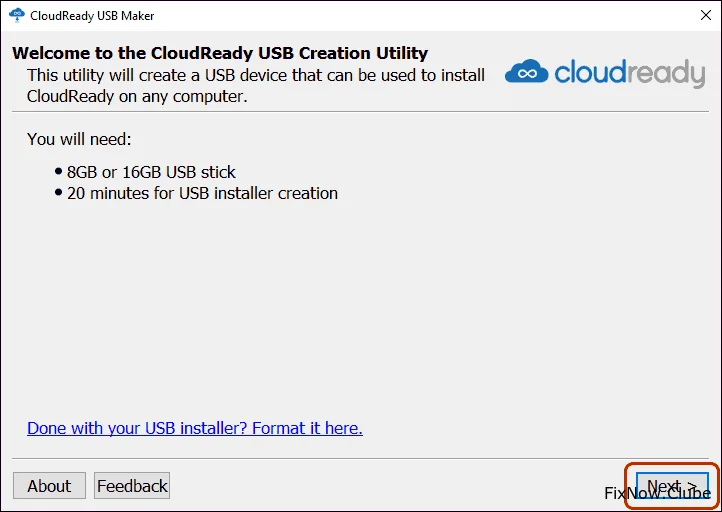
Run the USB Maker, insert the USB disk, and click Next
USB Maker will download the Chrome OS image (around 1.4 GB) and create a bootable USB for Chrome OS. After successfully creating the USB, click Finish to exit the wizard.
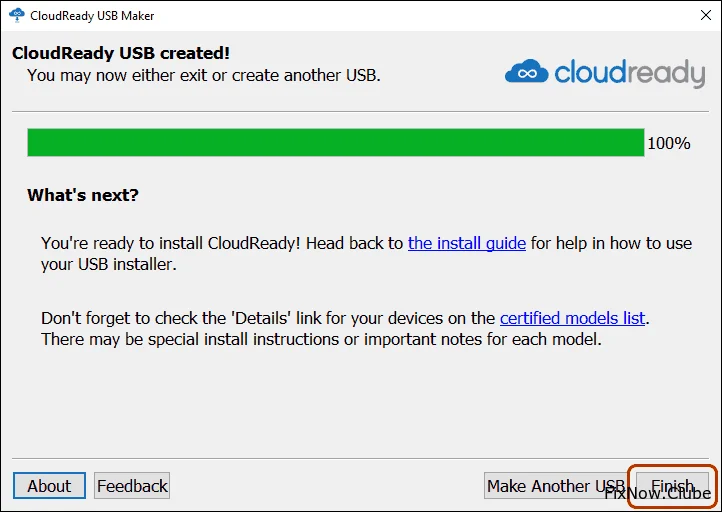
Click Finish to exit the wizard
Step 3: Boot your PC from CloudReady USB
Now, it’s time to boot your PC from Chrome OS bootable USB. You may need to set up your PC to boot from USB first. After that shut down your PC and turn it ON again. While starting up, press the dedicated boot key repeatedly to boot from the USB. Boot keys may differ for each manufacturer. Here, you can check for major manufacturers.
| DELL | Tap F12 when the Dell Logo is displayed. |
| HP | Tap F9 when the HP Logo is displayed. |
| Lenovo | Tap F12 when the Lenovo Logo is displayed. |
| Apple | Hold Option (next to the ⌘ key) when the computer first turns on. |
| Toshiba | Tap F12 or F2 when the Toshiba Logo appears. |
| Acer | Tap F12 as the Acer Logo appears. |
| Others | Try pressing the Esc, F1-F12, or Enter keys during bootup. |
From the boot menu, select the USB drive that you have created in the previous step. On successful boot, you will see the CloudReady screen.
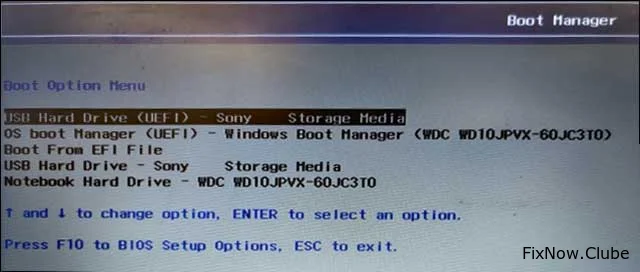
Select Bootable USB to install Chrome OS
Step 4: Start Chrome OS Installation
After loading the necessary files, you will see the Chrome OS setup screen. Now, click on the time menu at the bottom-right corner and then click Install OS.
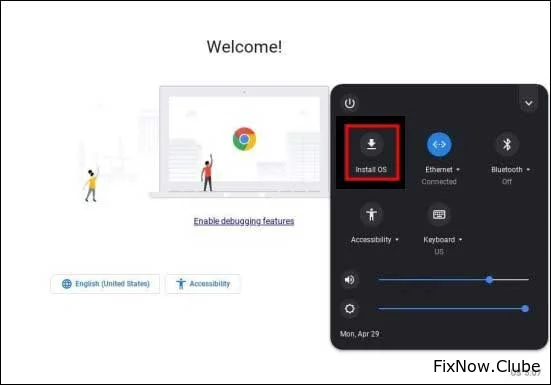
Click the time menu and then click the Install OS button
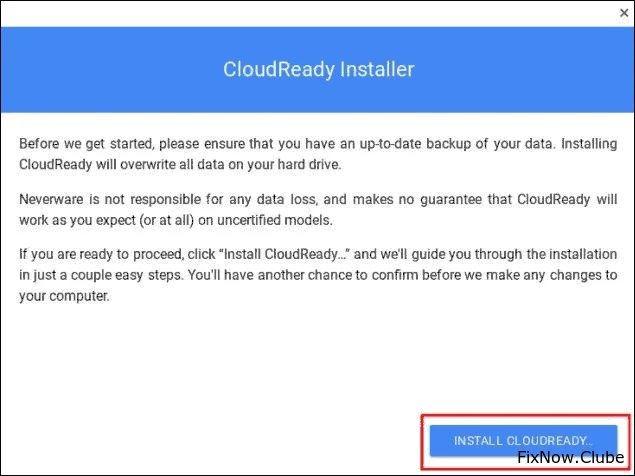
Next, you will see the CloudReady installer wizard. Here, click on the “INSTALL CLOUDREADY” button to continue.
NOTE: Since CloudReady has stopped supporting dual-boot, you can’t install Windows and Chrome OS together. And CloudReady setup will wipe your HDD completely. So, we suggest you back up your Windows PC before proceeding.
Comments (1)